Wix can seem like a good option for small businesses looking to set up their own website because you can create a site quickly using their beautiful templates and intuitive drag-and-drop interface. However, its limitations become more obvious as businesses grow, and the time inevitably comes to move on.
As I might have mentioned before when speaking about website builder vs. WordPress, both platforms have advantages and disadvantages, but if you’re moving from Wix because of the restrictions, WordPress should arguably be your next step. Unfortunately, Wix doesn’t make it easy to export your data, so it might seem like your only option is to start over with a new site. However, with a little work it is possible to move your content over to a WordPress site.
With the above in mind, this post will walk you through what you need to do before moving your site, what your options are for the move itself, then provide a step-by-step approach to getting the job done.
Let’s get cracking!
What You Need to Consider Before Moving from Wix
While you may have already thought about the limitations of Wix, there are some things you may be giving up that you need to think about before you move. Wix does have some advantages as mentioned before, and converting your site from Wix means having alternatives for those features.
Wix is a bundled hosted service that provides small businesses with everything they need to get a site up and running quickly. Moving from Wix will require you to pay attention to some of those things previously bundled, which includes a domain name and hosting.
And if you originally fell in love with the beautiful templates provided by Wix, then be warned that there is no real way to move the template from Wix. If you wish to have the same look and feel, this needs to be taken into consideration. There are many great WordPress themes available that enable you to create (or recreate) just about any look for your website, like our own Divi theme.
With that said, let’s start by looking at what you need to do in preparation for your big move.
Pre-Conversion
1. Purchase Hosting
As mentioned before, if you are moving from Wix, you need to get hosting for your website. There are a lot of hosting options available to host a WordPress website, from inexpensive shared hosting to managed hosting designed just for WordPress.
If you liked not having to worry about maintenance at Wix, then managed hosting is the best route for you. Specialized WordPress-only hosts include security, backups, WordPress updates and performance features. They are typically pricier than standard shared hosts, but are well worth it to keep your site safe.
Our WordPress Hosting Review covered the best specialized WordPress hosting and showed you how to decide which option is right for you. Some of the hosts we reviewed included:
Take a look through and choose a host that best meets your needs. Most hosts offer a no-contract clause, so you can get started by paying for just a single month.
2. Setup a Temporary Domain
Since your website is still live on Wix at this point, you will need to setup a temporary domain to use for your WordPress site. Once the move is complete, we will walk you through the steps to switch your domain to point at the WordPress site.
Many hosts will provide you domain registration free of charge, but you likely don’t need to (or want to) buy a new domain. Most hosts will give you a temporary subdomain either based on the account username entered when you created your hosting account with them, or from a randomly generated name unique to your account.
In many cases, you can provide a domain name without actually transferring it to the new host. If that is the case, then you should create a subdomain in the hosting control panel, e.g. http://wordpress.abc.com/.
Once you have done that, take note of the nameserver information for your new host, and add a DNS record (either an A record or a CNAME record) in the domains section of your Wix account.
3. Install WordPress on a Temporary Domain
For some hosts, this step may have been combined with the previous step if WordPress gets installed by default (which is the case with many of the WordPress specialized hosts).
If WordPress was not setup by default, installing it is a simple matter. Most hosts now provide easy one-click installation of WordPress, so you just need to follow the on-screen instructions and wait a few minutes. Alternatively, if you prefer to install WordPress manually, you can follow our guide to the famous WordPress 5 minute install.
Once your host confirms that the installation of WordPress is complete, you can visit your temporary domain to check that you can see the default theme. At this point, there some things we advise you to do after setting up any new WordPress site.
Now you’re ready to begin the conversion process. We will start by looking at the manual steps required.
Manual Conversion
At its most basic, converting your site from Wix to WordPress can be as simple as manually copying content from the Wix site and pasting into the WordPress site. If you’ve used a word processor then you have likely done exactly this before.
By doing the conversion manually you can ensure for yourself that each and every piece of content is copied to your new WordPress site. If your site is small (less than two dozen pages and posts), then this is definitely the way to go.
The disadvantage to this method is that it can be very tedious, and you may have to fix the formatting of the content after you paste. If you have several dozen pages and posts combined, manually copying them may take too much time and you should consider one of the other conversion alternatives.
Step 1: Setup Pages and Posts
The best advice we can offer if you are going to do a manual conversion is to create the pages and posts you need in the new site before starting. This will enable to to move quickly when you get to the next step, rather than having to stop to create each page as you go.
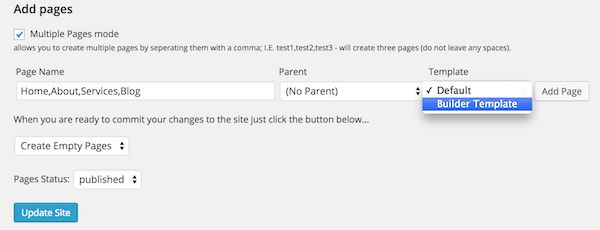
You can, of course, create the pages and posts manually, by going to the Add New menu option in the WordPress admin. To speed up this process, you can enlist the assistance of the Bulk Page Creator plugin to automate the page creation.
- Once the plugin is installed and activated, click on Settings > Bulk Page Creator.
- Enter the names of all the top-level pages, separated by commas (no spaces). Then click Add Page.
- For subpages, enter those page names as before, but select the parent page from the dropdown.
- Review the list of site pages on this screen and if satisfied, select Create Empty Pages and set the status to Published.
- Clicking the Update Site button will create all the pages listed.
Piece of cake!
Note that this plugin only creates pages, not blog posts. An alternative is the Bulk Post and Page Creator plugin, which is less well established, but enables the bulk creation of posts as well. This plugin does not preserve the creation order of posts so you may need to edit the published dates on posts to restore the order you prefer.
Step 2: Copy and Paste Content
This is the tedious step of the manual conversion process. For each page on your Wix site, you’ll need to manually copy the relevant text then paste it into the equivalent page within your WordPress installation.
If your page had images in the content, you’ll need to bring those over as well. This must be done manually, by saving each image from the Wix site and uploading to the WordPress site.
You will also need to fix any internal links. If you copied over a Wix page that linked to another Wix page on your site within the text, that link is going to point back to your old Wix site. All the pages were created in the WordPress site, so you can change that link to point to a page on the WordPress site.
These steps then need to be repeated for each page and post from your Wix site.
Not Good Enough?
As we mentioned, this is extremely cumbersome if the site has many pages and posts. So, we will next take a look at how you can automate parts of the process to make it easier and faster.
Semi-Automated Conversion
The manual conversion method outlined above still included the use of at least one plugin. As most site owners realize very quickly, plugins help to automate many tasks, saving time and reducing the likelihood of errors in many cases.
Several steps in the conversion process can be automated with plugins, which we will look at now.
Step 1: Import Posts Using Wix RSS Feed
WordPress supports importing content from a variety of other platforms as posts. Most website platforms, Wix included, provide an RSS feed, which we can leverage to make the importing process more efficient.
First, save the Wix RSS feed on your local machine. To view your RSS feed on Wix:
- Click the RSS Button on the live site and your feed will open as an XML file in a new tab in your browser.
- Save this file.
The XML file produced by the RSS feed does not include the images from the blog posts, so those will need to be added afterwards.
To import the RSS file into the new site, first make sure the WordPress RSS importer is setup on your site.
- Go to the Tools > Import menu in the WordPress administration interface.
- Click on RSS in the list of options presented and install the RSS Importer plugin from the popup screen.
- When the installation has completed, click Activate and Run Importer.
- Click the Browse button and navigate to the file saved previously.
- Click Import.
In some cases, the entire feed may not import on the first attempt. One option is to check how many posts got imported (under Manage > Posts) and remove those sections from the saved file and re-import.
Step 2: Manually Convert Pages
Unfortunately, there is no automated tool to import pages from a Wix site into a WordPress site. Although it is possible to use a plugin to import static HTML files to WordPress, Wix does not allow you to export your pages.
So for this step, we return to the manual conversion method for the pages. Remember you can use the Bulk Page Creator plugin to help speed this up. Create the pages and then copy and paste the content as described before. You can fix any formatting issues and update links before moving on to the images in the next step.
Step 3: Import Images
This time, instead of manually saving and re-uploading images, we will use the Import External Images plugin. It looks at the HTML source code of the post or page and finds img tags with links to images on other websites, copies the image files to your new web site, then updates the code to point to the new image. Like freakin’ magic.
- Once you’ve installed and activated the plugin, navigate to to Media > Import Images.
- Enter any domains to be excluded, such as images stored on a Content Delivery Network (CDN) or photo hosting site.
- Click Save.
It is important to note that this plugin has not been updated in a year. But if you have a lot of images, it may well be worth a try.
Not Good Enough?
The plugins we have looked at in this method make the conversion process a lot easier, but you may find yourself having to tweak content after importing to get it quite right if a plugin doesn’t work perfectly the first time.
As such, if your site is large and complex, contains a large number of images, or involves custom post types, you might want to consider outsourcing the migration to save yourself the time. So, let’s take a look at that option.
Outsourced Conversion (Paid)
If you have decided to save yourself the time of trying to convert your Wix site by yourself, there are several sites and services offering to do Wix to WordPress conversions. One of the more established is CMS2CMS, which do migrations between all the major content management systems (CMS).
Given the work involved in converting, these services are of course all paid offerings. CMS2CMS does not quote an actual price without you entering some data and doing a free demo migration (limited to a small number of pages), but they do say that full migrations start at $9. You can get an estimate using the calculator on their pricing page.
Step 1: Setup the CMS2CMS Migrator Plugin
CMS2CMS provides a WordPress plugin to assist with transferring Wix site content to WordPress. Once you’ve installed and activated the plugin, you will be redirected to the CMS2CMS website, where you can create your account (or login if you already have).
Step 2: Run the Demo Migration
The demo migration is a required step if you are not going for a full service package where the CMS2CMS technical staff will do everything for you.
- Enter the URLs for the source and destination sites.
- Confirm the CMS types (i.e. Wix to WordPress).
- Choose any additional migration options:
- migrate media (import images)
- make URLs SEO-friendly
- clear current target data (NOTE: This will delete any existing data on the WordPress site)
- get design suggestion (offered to choose a theme similar to that of the Wix site)
- redirect URLs
- Click Start Migration.
This demo migration will migrate ten pages of content with any images or other related items.
Step 3: Run the Full Migration
If you are happy with the results of the demo migration, you can proceed with the actual migration.
By default, this DIY migration from CMS2CMS does not come with any real support, but you can pay for migration insurance, which enables you to restart the migration within a specified period of time (in case it does not work as you expected the first time).
If you want a completely hands-off experience, you can pay for one of the premium full service packages. Starting at $299, these packages include migration of large numbers of pages, customization of the migration, and even migration of the design of your Wix site.
Post-Conversion
Now that actual conversion process is done, there are some things you will need to do before you can take your nice new WordPress site live. We are nearing the home stretch now, so here are the remaining steps of this move from Wix.
Step 1: Choose and Customize a Theme
As was mentioned before, you can’t move your Wix template. If you went with a full service migration package like those offered by CMS2CMS, you may be able to have a custom WordPress theme created based on your Wix template. Otherwise, you will need to select a WordPress theme that best matches the look you want for your site.
There are thousands of free themes available in the WordPress directory, and hundreds of free and premium themes offered elsewhere, so you should be able to find the perfect theme for your site. We took a look at the best themes if you’re on a budget, and we also shared our thoughts on how to choose between free and premium WordPress themes.
Regardless of the theme you choose, you may still need to do some customization to get it looking the way you want. Many themes now come with easy-to-use options and customization panels to tweak the color schemes, layouts and other features.
Step 2: Setup Any Other Features (e.g. Forms, Widgets)
If you had any functional areas of your Wix site, now is the time to recreate that in WordPress. Forms and widgets like calendars or tag clouds can easily be setup in WordPress. This step is really just a matter of examining your Wix site to see if there are any features that you want carried over to your WordPress website.
Step 3: Test Site
At this point, your site should be nearly or completely converted. Make sure to test it thoroughly in your browser to ensure it works as expected. Don’t forget to check for broken links you might have missed if you did any manual conversion. You can use the Broken Link Checker plugin to scan all pages, posts and other content and notify you if any links are broken.
Step 4: Point Your Domain at the Destination Site
Once you are satisfied that the conversion is completed, it is time to switch over the domain. There are two parts to this process:
1. Transfer Your Domain From Wix
Assuming you purchased your domain from Wix originally, transferring the domain is relatively straightforward.
- Sign into your Wix account.
- Hover over the Subscriptions.
- Click Domains
- Click the relevant domain.
- Click the Advanced tab.
- Click Transfer away from Wix.
- Click Send Code.
The email code will be sent to your email address and you will need to provide it to your new host to complete the transfer.
2. Change Your WordPress Site to Use Your Domain
Once the transfer is complete, WordPress can be set to use the domain instead of the temporary one you setup in the beginning. First check the General Settings page within WordPress, because both the Home URL and Site URL will need to be changed from the temporary domain to the live one.
To help with changing the URLs throughout the site content, you can use a plugin like the Velvet Blues Update URLs plugin. In the plugin settings, you can choose to update links embedded in content, excerpts, or custom fields, and whether to update links for attachments.
Conclusion
As we’ve shown above, moving your website from Wix is not easy, but it can be done a few different ways:
- Manually, copying and pasting content from pages and posts
- Semi-automated, using plugins for some of the key steps
- Outsourced, through a service like CMS2CMS
In this article we’ve given you a comprehensive overview of those different options. All that’s left is for you to choose the right one for you and get to work!
If you have any questions or concerns regarding the process, please don’t hesitate to get in touch via the comments selection below. We’ll be happy to help!
By Tom Ewer
Tom Ewer is a professional writer, blogger and longtime WordPress enthusiast. He’s written over 1,000 articles across the web on the world’s most popular Content Management System, and has no intention of slowing down!